List Boxes
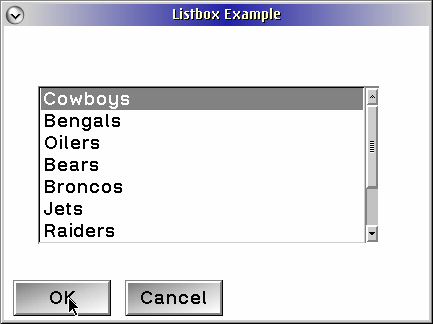
A list box (see Figure 15.1) is a control that provides the user with a
list of choices. Single or multiple items can be selected; the default
is single. A list box can scroll horizontally, vertically, or both. List
boxes, by default, contain only text entries, although they are not limited
to only text.
| The items in a list box should be presented in some order meaningful
to the user. A list box should be large enough to have six or eight choices
visible at all times and wide enough to display an item of average width
without horizontal scrolling. If multiple selection is supported, informative
text should be provided to indicate the current number of selected Items.
|
| Figure 15.1 A list box control.
|
List Box Styles
The styles presented in Table 15.1 can be used when creating a list box.
Table 15.1 List Box Styles
| Style |
Description |
| LS_MULTIPLESEL |
Supports selection of multiple items |
| LS_OWNERDRAW |
Generates a WM_DRAWITEM whenever certain parts are to be drawn. |
| LS_NOADJUSTPOS |
Will not size the list box |
| LS_HORZSCROLL |
Will have a horizontal scroll bar along the bottom and will support
horizontal scrolling. |
| LS_EXTENDEDSEL |
Lets the user select more than one item using a point-end-point selection
technique. |
Extended Selection
List boxes also support a selection technique known as extended selection.
Extended selection supports a "swiping" technique to select the list box
items. Table 15.2 shows the keystrokes and mouse actions defined in a extended-selection
list box.
Table 15.2Extended Selection List Box Keystrokes
| Movement |
Action |
| Click mouse button on object |
Selects object; all others are deselected. |
| Drag mouse from start point of selection to end point of selection |
Selects all objects in area; all other objects are deselected. |
Press SHIFT key while cursor is at start point and use  and and keys
to move to end point keys
to move to end point |
Selects all objects in area; all other objects are deselected. |
| Click mouse button on object while pressing Ctrl key |
Selects object; all other selected objects are left selected. |
| Press Ctrl+spacebar, or spacebar while cursor is positioned at object |
Selects object; all other selected objects are left selected. |
| Press Ctrl key while dragging mouse from start point of selection to
end point of selection |
Selects all objects in area; all other objects are deselected. |
The following LIST1 example program shows a very introductory list box
program. This list box has the LS_MULTIPLESEL style and communicates with
the client area to have the selections displayed in the window.
LIST1.C
LIST1.RC
LIST1.H
LIST1.MAK
LIST1.DEF
In the LIST1 sample program, the dialog box will post a message, UM_LISTBOXSEL,
to the client area when the OK button is pressed. When the client area
receives this message, it queries the list box to determine which items
have been selected. These items are stored in the user-defined window word
area for the client window. Also a flag, fSelectedItems, is set
to indicate items have been selected.
When the WM_PAINT message is received, the client area is cleared.
If the flag fSelectedItems is set, the items in the window word
are written to the client area.
Initializing the Client Window
The structure LISTBOXINFO is used to hold the list box information
typedef struct
{ USHORT ausListBoxSel[NUM_ENTRIES];
} LISTBOXINFO,*PLISTBOXINFO;
The array ausListBoxSel[] is used to hold the items
that have been selected.
The WM_CREATE message processing is were the memory is allocated for
the structure LISTBOXINFO. WinSetWindowPtr is used to assign the
pointer to the structure pliInfo to the window word.
Initializing the List Box
hwndListBox = WinWindowFromID(hwndDlg,
IDL_LISTBOX);
for (i = 0; i < NUM_ENTRIES; i++)
WinInsertLboxItem(hwndListBox,
LIT_END,
pszListBoxEntry[i]);
The WM_INITDLG message processing initializes the list box. The first
step is to obtain the window handle of the list box using WinWindowFromID.
The dialog box is the parent of all the controls in it. The macro WinInsertLboxItem
is a shortened version of the function WinSendDlgItemMsg, designed
specially to insert items into list box. The first parameter is the list
box window handle, hwndListBox. The second parameter indicates the
position in the list box to insert the item. Acceptable entries are either
an integer value indicating the placement of the item (0 indicates the topmost
item) or the constant LIT_END. Also, the list box control is smart enough
to sort the items alphabetically. The constants LIT_SORTASCENDING and LIT_SORTDESENDING
can be used to automate this process. Alphabetization takes some time,
though; sorting the list box items before inserting them in the list box
may increase performance. The last parameter is the text string to enter
into the list box. The header file LISTBOX.H contains the definition
for pszListBoxEntry.
WinSendDlgItemMsg(hwndDlg,
IDL_LISTBOX,
LM_SELECTITEM,
MPFROMSHORT(0),
MPFROMSHORT(TRUE));
One
other nit about the list box: The first item must be selected manually. The
message LM_SELECTITEM will do this for us. The first parameter is the index
of the list box item to be selected. The second parameter indicates whether
the item is selected (TRUE) or deselected (FALSE). Notice that this time
we use the function WinSendDlgItemMsg; this is another way to send messages to items in a dialog box.
The WM_COMMAND Message Dialog Processing
hwndClient = WinQueryWindow(hwndDlg,
QW_OWNER);
if (!hwndClient){
DisplayError("WinQueryWindow Failure:1");
break;
}
WinPostMsg(hwndClient,
UM_LISTBOXSEL,
MPVOID,
MPVOID);
/*********************************************/
/* if hit OK, don't dismiss
dialog */
/*********************************************/
return (MRFROMSHORT(TRUE));
When the user presses either the Ok or the CANCEL button,
the system sends a WM_COMMAND message to the dialog box. mpParm1 contains
the ID of the pushbutton, either DID_OK or DID_CANCEL. If the user presses
DID_OK, the system sends a user-defined message, UM_LISTBOXSEL, to the client
window and returns TRUE. This prevents the system from dismissing the dialog
box.
If the user presses the CANCEL button, the dialog box is destroyed, using WinDismissDlg. Also, a UM_LISTBOXSEL message is sent to reset the LISTBOXINFO structure and repaint the client window area.
Processing the UM_SELECTBOXSEL Message
SHORT
sSelect = 0;
SHORT
sIndex = LIT_FIRST;
HWND
hwndDlg;
USHORT i;
/***************************************************/
/*
first set all to
unselected
*/
/***************************************************/
for (i = 0; i < NUM_ENTRIES; i++)
pliInfo->ausListBoxSel[i] = FALSE;
hwndDlg = WinWindowFromID(HWND_DESKTOP,
IDD_LISTBOX);
/***************************************************/
/*
get selected items from
listbox
*/
/***************************************************/
while (sSelect != LIT_NONE && hwndDlg)
{
sSelect = (SHORT)WinSendDlgItemMsg(hwndDlg,
IDL_LISTBOX,
LM_QUERYSELECTION,
MPFROMSHORT (sIndex),
MPVOID);
pliInfo->ausListBoxSel[sSelect] = TRUE;
/************************************************/
/* set query to start at last selected item */
/************************************************/
sIndex = sSelect;
}
/***************************************************/
/*
invalidate the
window
*/
/***************************************************/
WinInvalidateRect(hwndClient,
NULL,
FALSE);
break;
When the client window receives the UM_LISTBOXSEL message, it is
the client's job to find the selected list box items. Our list box has style
LS_MULTIPLESEL, so the user can select as many items as he or she wants.
Because so many items can be selected, the procedure to find all of them
can be a little tricky; not difficult, just tricky. The message LM_QUERYSELECTION
starts at the list box item specified in mpParam1 and returns the first selected item it finds. This is a fairly simple procedure to code. A while loop continues searching until sSelect
equals LIT_NONE (in other words, no more items are selected). We next send
a LM_QUERYSELECTION message to the list box window, with the variable sIndex
indicating the index of the item at which to start the search. At the start
of the loop, this variable is LIT_FIRST, the first item in the list box.
When the first selected item is found, the variable sSelect contains
the index of th item. As the loop traverses through the items in the list
box, the starting search point is updated to sSelect. As a selected item is found, the corresponding index in the array ausListBoxSel[] is set to TRUE. This information is used in the WM_PAINT processing.
The Client Window Painting Routine
The WM_PAINT processing is where the items selected in the list box actually
are written to the client area window.
WinFillRect fills the drawing region with the color CLR_WHITE.
bReturn = WinQueryWindowRect(hwndClient,
&rclPaintRegion);
rclNewPaint.xLeft = (rclPaintRegion.xRight-
rclPaintRegion.xLeft) / 4 * 3;
rclNewPaint.xRight = rclPaintRegion.xRight;
rclNewPaint.yBottom = rclPaintRegion.yBottom;
rclNewPaint.yTop = rclPaintRegion.yTop;
WinFillRect(hpsPresentationSpace,
&rectInvalidRect,
CLR_WHITE);
If the use has selected some items, WinDrawText is used to write a heading on the client area. The array ausListBoxSel[] is cycled through to find each selected item and write the list box item text to the client area as well.
Owner-Drawing Controls
An owner-draw style can be used
for many of the Presentation Manager controls. This style sends aWM_DRAWITEM
message when some portion of the control is to be drawn. This feature lets
the programmer customize the appearance of the control.
The LISTBOX example program creates an owner-drawn list box that has system bitmaps and their titles as the selectable items.
LISTBOX.C
LISTBOX.RC
LISTBOX.H
LISTBOX.MAK
LISTBOX.DEF
The beginning of the program should look familiar. The structure BITMAPDATA is defined:
typedef struct _BITMAPDATA
{
CHAR achName[20];
USHORT usNumber;
} BITMAPDATA,*PBITMAPDATA;
The first field, achName, is the #define'd text string of each system bitmap. The second field, usNumber, is the number of the system bitmap. When we draw the bimaps, we'll use this structure to access the bitmaps we want.
DlgProc
for (usIndex = 0; usIndex < MAX_BITMAPS; usIndex++)
{
WinSendDlgItemMsg(hwndDlg,
IDL_LISTBOX,
LM_INSERTITEM,
MPFROMSHORT(usIndex),
MPFROMP(""));
}
/*
endfor
*/
The WM_INITDLG message is where the initialization of the dialog box and
all its components takes place.
In this case, we want to initialize the list box. WinSendDlgItemMsg
can be used to communicate directly with it. The message LM_INSERTITEM is
used to insert items into list box. If this was not an owner-drawn list box,
the actual text strings would be inserted here; however, because this is an
owner-drawn list box, it is important to tell the list box there will be
eight items. The message LM_SELECTITEM is used to set first item to the selected
state.
The WM_MEASUREITEM Message
for (usIndex = 0; usIndex < MAX_BITMAPS; usIndex++)
{
hbmBitmap = WinGetSysBitmap(HWND_DESKTOP,
abdBitmaps[usIndex].
usNumber);
bmihHeader.cbFix = 16;
GpiQueryBitmapInfoHeader(hbmBitmap,
&bmihHeader);
/************************************************/
/* which is larger, previous max or
bitmap */
/************************************************/
lMaxCy = max(lMaxCy,
bmihHeader.cy);
/************************************************/
/* free the
bitmap
*/
/************************************************/
GpiDeleteBitmap(hbmBitmap);
}
/*
endfor
*/
return MRFROMLONG(lMaxCy+10);
The WM_MEASUREITEM message must be processed for an owner-drawn list box and
also for horizontal scrolling list boxes. This message tells the list box
how tall or, in some cases, how wide each list box item is to be. The tallest,
or widest, size should be returned in order for all the list box items to
have a consistent look. In our example, all items are the same size. GpiQueryFontMetrics
is used to get all sorts of information about the selected font. The one
piece of the FONTMETRICS structure we are interested in is fm.Metrics.lMaxBaselineExt.
This indicates the maximum height of the font. This is compared to the maximum
height of the system bitmap. This information is contained in the BITMAPINFOHEADER
structure that is obtained using GpiQueryBitmapInfoHeader. After the comparison, we free the bitmap handle with GpiDeleteBitmap.
The WM_DRAWITEM Message
The WM_DRAWITEM is the most
complicated message processing in this example. This message is sent to the
owner that will be doing the drawing whenever an item needs to be selected,
unselected, or drawn. The second parameter in the WM_DRAWITEM message is
a pointer to an OWNERITEM structure, which looks like this:
typedef struct _OWNERITEM /* oi */
{
HWND hwnd;
HPS hps;
ULONG fsState;
ULONG fsAttribute;
ULONG fsStateOld;
ULONG fsAttributeOld;
RECTL rclItem;
LONG
idItem; /* This field contains idItem for menus, iItem for lb. */
ULONG hItem;
} OWNERITEM;
typedef OWNERITEM *POWNERITEM;
This structure has pretty much everything you need to draw a list box item.
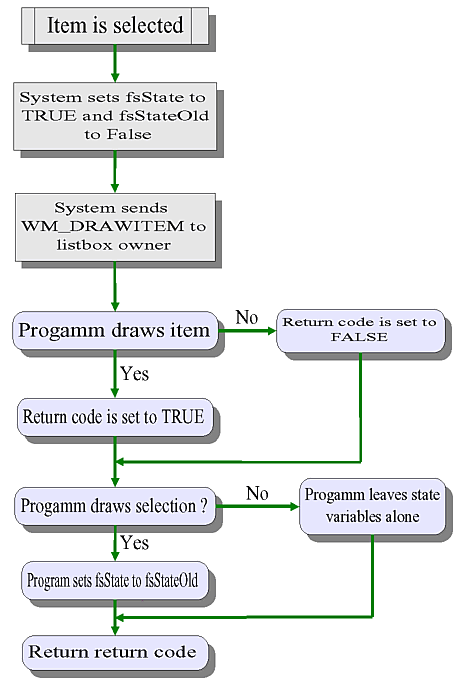
An Introduction to Owner-drawn States
The OWERITEM structure contains the variabes fsState and fsStateOld.
The state variables indicate whether an item needs selection highlighting.
When an item's selection highlighting is changing, the item needs to be
redrawn, and the fsState field will be set differently from the fsStateOld
field. A state of TRUE indicates the item is selected; FALSE indicates an
unselected item. Programmers can draw the highlighting themselves or let
the system handle the highlighting and unhighlighting. The flowchart depicted
in Figure 15.2 lists the possible combination of states and returns and the
action by both the program and the system.
|
|
Figure 15.2 Flowchart of owner-drawn selection
|
|
The system sets these variables before the WM_DRAWITEM message is sent; it
looks at what is returned in them after the WM_DRAWITEM message has been
processed to determine whether to handle the highlighting of the item.
If fsState is equal to fsStateOld, the system will do no highlighting.
If the variables are not equal to each other, the system will highlight them
or unhighlight them by inverting the item rectangle.
Drawing the List Box Labels
poiItem = (POWNERITEM)PVOIDFROMMP(mpParm2);
rclText = poiItem->rclItem;
rclText.xLeft = (rclText.xRight-rclText.xLeft)/7;
/***************************************************/
/*
draw the bitmap
name
*/
/***************************************************/
WinDrawText(poiItem->hps,
-1,
abdBitmaps[poiItem->idItem].achName,
&rclText,
poiItem->fsState?CLR_YELLOW:CLR_BLUE,
poiItem->fsState?CLR_BLUE:CLR_WHITE,
DT_LEFT|DT_VCENTER|DT_ERASERECT);
A pointer to OWNERITEM structure is contained in mpParm2.
The rclItem
field is the RECTL structure of the specific list box item that needs to
be drawn. We indent the text one-seventh of the way across and use the function
WinDrawText to write the bitmap name. Notice the use of the flag DT_ERASERECT
in the last parameter. This flag erases the drawing area before Presentation
Manager draws the text.
Drawing the Bitmaps
rclText = poiItem->rclItem;
rclText.xRight = (rclText.xRight-rclText.xLeft)/7;
/* fill the rectangle with
white
*/
WinFillRect(poiItem->hps,
&rclText,
CLR_WHITE);
hbmBitmap = WinGetSysBitmap(HWND_DESKTOP,
abdBitmaps[poiItem->
idItem].usNumber);
/* draw the bitmap, then
delete
*/
Draw1Bitmap(poiItem->hps,
hbmBitmap,
&rclText);
GpiDeleteBitmap(hbmBitmap);
The next thing to do is get a handle to the bitmap we want to draw in our
list box item.
WinGetSysBitmap
is used to do this. The first parameter is the desktop window handle, HWND_DESKTOP.
The second parameter is the system bitmap number. poiItem->idItem is the index of the selected item. We use this index as the index into the abdBitmaps structure. Draw1Bitmap
is a very simple user-defined function we use to actually draw the bitmap.
Once bitmap has been drawn, some cleanup will be necessary. The handle of
the bitmap needs to be freed using GpiDeleteBitmap.
poiItem->fsState = FALSE;
poiItem->fsStateOld = FALSE;
return MRFROMSHORT(TRUE);
The last step in our message processing is to set all the
appropriate variables correctly for the window procedure. We set fsState and fsStateOld
to FALSE to tell the system we already have done highlighting. A return code
of TRUE indicates that the item has been drawn already, so please do not
draw it again. If FALSE had been returned here, the text " ", the string
that was used in the LM_INSERTITEM message, would be placed over all wonderful
work we've done so far.
For more information on drawing bitmaps, see Chapter 12.
Summary
A list box is a very simple control to use,
yet it provides a powerful level of functionality. This chapter has introduced
the concepts of a regular list box and owner-drawn list box. Developers interested
in creating their own, even more advanced list box, should refer to the series
of articles by Mark Benge and Matt Smith starting in the January/February
1994 OS/2 Developer magazine.